
The Help menu is a useful home for an internal user guide, training material or a support portal that should be easy to reach from Maximo. The configuration lives in menus.xml, but the tool and menu ID differ between the traditional Maximo interface and the newer Maximo 9 shell.
The procedure below covers the traditional Application Designer workflow. A separate section explains where the equivalent change belongs in Maximo 9.
Back up the exported XML before editing it.
menus.xmlis shared system configuration. A malformed import or duplicate control ID can affect menus throughout the interface, so make the change in a non-production environment and keep a tested rollback file.
Traditional Maximo 7.x interface
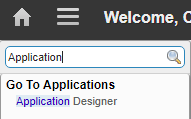
Sign in with access to Application Designer, then open System Configuration > Platform Configuration > Application Designer. You can also find it from the Go To search.
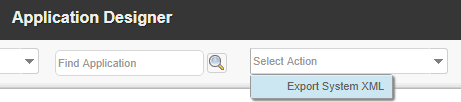
From Select Action, choose Export System XML.
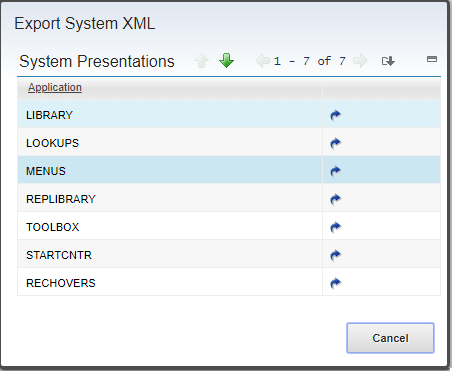
Select the export icon beside MENUS and save the downloaded XML somewhere outside your working copy. Keep one untouched copy as the rollback version and edit a second copy.
Open the editable file in a text editor and search for:
id="HELP"The surrounding definition resembles this shortened extract:
<menu id="HELP">
  <menuitem
    event="maximohelp"
    id="tophelp"
    image="menu_icon_apphelp.gif"
    label="Maximo Asset Management Help"
    licensekey="EAMTOPHELPMENU"
    value="mxe.help.maximohelplink"
  />
  <menuitem
    event="apphelp"
    id="help1"
    image="menu_icon_apphelp.gif"
    label="Help"
  />
  <!-- Other standard help entries appear here. -->
  <menuitem
    event="helpabout"
    id="help5"
    image="menu_icon_information.gif"
    label="System Information"
  />
</menu>
The exact standard entries depend on the installed release and add-ons. Edit the XML exported from your own environment rather than replacing the entire HELP menu with this example.
Add the custom link
Add a loadlink item before the closing </menu> tag:
<menuitem
  event="loadlink"
  id="internalTrainingGuide"
  label="Open the training guide"
  link="https://docs.example.com/maximo/training-guide.pdf"
/>
The important attributes are:
event="loadlink"tells Maximo to open a URL.idmust be unique within the system XML. Use a stable, descriptive value rather than the genericNEWLINK_IDfrom the example.labelis the text users see in the Help menu.linkmust be a complete URL that the users' browsers can reach.
Host the document on a maintained HTTPS service and give users read-only access. Avoid linking directly to a file copied into a temporary application-server or Doclinks directory unless that location is deliberately published, secured, backed up and retained during deployments.
The end of the menu now looks like this:
  <menuitem
    event="helpabout"
    id="help5"
    image="menu_icon_information.gif"
    label="System Information"
  />
  <menuitem
    event="loadlink"
    id="internalTrainingGuide"
    label="Open the training guide"
    link="https://docs.example.com/maximo/training-guide.pdf"
  />
</menu>
Save the file, return to Application Designer and use the Import XML toolbar action to import the modified system XML. Sign out and back in, then confirm that the new item appears and opens the intended document.
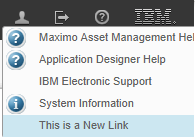
Check the result with a normal user as well as an administrator. The linked system can still deny access based on its own authentication and permissions, which is preferable to making internal material publicly accessible.
Maximo 9 shell
Maximo 9 uses the Maximo Application Framework Configuration tool for shell-level Help menu changes:
- Open the Maximo Application Framework Configuration tool with administrative access.
- Open
MANAGE-SHELLin the editor. - Locate its
menus.xmlfile. - Add the custom item to the
MASHELPmenu, using a unique ID andevent="loadlink". - Save and preview the change.
- Test the link, then publish the configuration.
A minimal Maximo 9 entry looks like this:
<menu id="MASHELP">
  <menuitem
    event="loadlink"
    id="internalTrainingGuide"
    label="Open the training guide"
    link="https://docs.example.com/maximo/training-guide.pdf"
  />
</menu>
Do not rename the Maximo 9 menu to HELP; IBM requires the shell menu ID to remain MASHELP. Likewise, do not import this shortened block as a replacement for the complete file. Add the item to the existing menu in your environment.
Validate and roll back
After either type of change:
- confirm the Help menu opens without browser-console or server-log errors;
- test the link through the same proxy, SSO and network path used by ordinary users;
- verify that the destination does not disclose internal material before authentication;
- check the menu at narrow viewport sizes and with keyboard navigation; and
- retain the original XML and record the custom item in your deployment documentation.
If the menu fails, restore the untouched export through the same configuration tool and retest. Keeping the change to one new menuitem makes that rollback easy to review.